

File Set Up Guide
01

Open Your File
Start by creating or opening your file in Photoshop. Since Photoshop does not allow for bleed margins, we will need to account for that within our image size.
For this example, the finished trim size of the document will be 5.5 inches wide by 8.5 inches tall. We will need a minimum of 0.125 inch bleed on each side, so we will adjust our image size accordingly, leaving us with 5.75 inches by 8.75 inches.
02
Prepare Your Layers
This example file will include the following enhancements:
-
Gold Foil
-
Silver Foil
-
SculptedUV (SUV for short)
Artwork for each enhancement will need to be separated onto its own layer, with any base artwork (printing CMYK) left separate as well. The names for these layers do not matter for printing, so long as they are organized in a way you can differentiate them from each other.


03
Select Artwork
Next, we need to select the pixels on each layer receiving an enhancement. To do this, we need to select all opaque pixels on a layer. The shortcut commands for this is Ctrl-click (Windows) or Command-click (Mac) the layer thumbnail in the Layers Panel.
Attention!
Images and gradients can NOT be sculpted. Your artwork will need to be completely opaque with no gray tones. A quick way to do this is to adjust your curves similar to the example shown.


Alternatively, you can download our quick Photoshop Actions. These work best for adding texture to photographs. TIP: Invert your photographs before applying the actions. The actions read the shadows. By inverting, you will essentially be applying the filter to the "highlights" of the photo.

04
New Spot Channel
Once you have your pixels and layer selected, move over to the Channels window. Make sure your file is using the "CMYK" color mode.
Click the hamburger menu in the corner and select "New Spot Channel" in the drop-down.
05
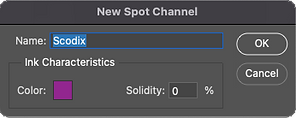
Create Your Spot Color
In the window "New Spot Channel" name your spot color "Scodix". Double-check that the spelling is correct, and the "S" is capitalized. This is a vital step in order for the press to read your files accurately.
Your CMYK values should be as follows:
-
C: 50
-
M: 100
-
Y: 0
-
K: 0


06
Channels
Repeat Step 3 for all applicable enhancement layers. Use the same "Scodix" spot color for all new layers; do not change the name.
For this example, you can see 3 new spot channels for the gold foil, silver foil, and SculptedUV.


07
Export Your Files
Once all of your channels are made, it's time to save out your files.
Make sure only one of your channels is selected at a time, and go to File > Save As and then Save as PDF. Don't forget to save out your base artwork layer normally, with all other layers hidden.
For this example, the final exported files should be as follows:
-
FOIL3D_Photoshop_GOLD FOIL.pdf
-
FOIL3D_Photoshop_SILVER FOIL.pdf
-
FOIL3D_Photoshop_SUV.pdf
-
FOIL3D_Photoshop_Base.pdf
That's It!
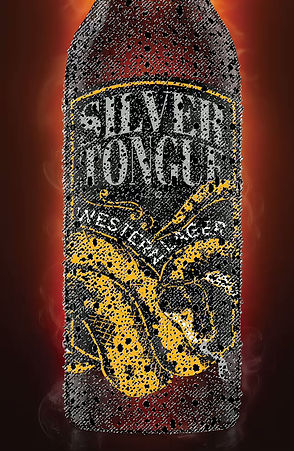
Once these steps have been completed, you should be left with something that looks like this.


